Important Update to our Blogger Integration
Over the next couple of weeks Blogger will gradually roll out redirects to country-code URL’s (or ccTLD’s) for all Blogger sites. Per Blogger’s support page:
If you’re in Australia and viewing [blogname].blogspot.com, you might be redirected [blogname].blogspot.com.au. A ccTLD, when it appears, corresponds with the country of the reader’s current location.
This update will unfortunately cause a major issue with our Blogger Widget installation, where the same post will show different sets of comments depending on which ccTLD your readers visit.
The good news is that Blogger sites using our Template installation are all set and will not be affected by this change. You don’t have to do anything, so kick back and relax.
The not-so-good news is that if you are using our Blogger Widget installation, you will need to switch over to our Template installation to ensure that everything runs smoothly. It really is essential that you do this. If it weren’t, we wouldn’t bother you. Don’t worry, we’re here to help and we hope to make this as painless as possible.
Please note:
- You won’t lose any of your existing comments if you follow the instructions below.
- Custom domains are not affected by this change. However, we would ideally like to discontinue our Widget installation. The Template install is much more stable, and future backend updates will most likely only apply for Template installations. We realize that it’s a pain, but it will be worth it in the long run.
Here’s how you can switch over to the Template installation:
- You will first need to uninstall the Widget from your site. The following instructions are for the updated Blogger interface. If you are using the old Blogger interface, please switch over to the new interface temporarily. You can do that by selecting the “Try the updated Blogger interface” link at the top of your Blogger dashboard.
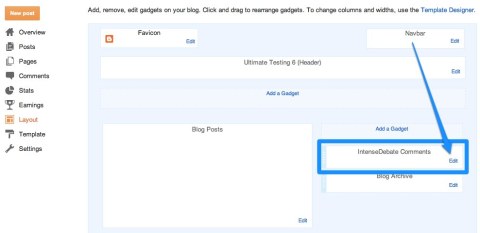
- Go to your Blogger account and find the blog that you have the IntenseDebate Widget installed on in your blogs list. Click the down arrow, then click Layout.
- Locate IntenseDebate in the sidebar and click the Edit link.
- Select Remove from the edit screen, then select the orange Save arrangement button at the top of the page.
- Next your will need to reinstall IntenseDebate using the Template installation method. To do that go to your Blog Tools tab in your IntenseDebate account. Select Reinstall and follow the installation instructions. You should be all set.
- If you want to switch back to the old Blogger interface, click on the little gear symbol on the right side of the page below your profile picture. Then select the option to switch to the “Old Blogger interface” and you’ll be all set.
Again, we’re here to help. If you come across any issues, you can contact us here. Make sure you include the URL of your blog when you contact us.
We apologize for the inconvenience and appreciate your understanding. For more information about Blogger’s ccTLD redirect change please check out their support documentation here.
Posted by Michael Koenig in Blogger,News


